I recently consulted for an agency who was trying to add a custom column to the WooCommerce Customers screen. Normally this would be easy, whether adding columns to a post type or to the WordPress users screen. However, the Customers screen specifically is built with React and doesn’t use any of the same actions or filters.
We originally referenced the blog post below which was a useful starting point. However, it does not address the Customers screen, and also does not explain how to add custom data to the user’s object.
What you’ll need
This implementation does not rely on React or NPM build processes, so any WordPress install with WooCommerce should work.
There are a few key components needed for this setup:
- Include a custom JavaScript file in order to:
- Register the custom column
- Display the column header
- Display the column contents for a single user
- Add custom data to the user object (optional)
A great feature of registering the table with JavaScript is that we can use the same code to display the column header and contents, without needing several different filters spreads across our plugin. In fact, we’ll only need two filters and a JavaScript file.
Including the JavaScript
Inside your plugin or theme, you’ll need to include a JavaScript file. You can set this file to only be included on the Customers screen.
This example is designed to be placed in a plugin. If you would like to use a theme, try replacing plugin_dir_url with get_theme_file_uri so that the URL points to your theme instead.
function rs_customers_enqueue_scripts() {
    wp_enqueue_script(
       'rs-customers',
       plugin_dir_url(__FILE__) . 'admin.js',
       array( 'wp-hooks', 'wp-element', 'wp-components', 'wp-i18n', 'wp-data', 'wc-admin-app' ),
       '1.0.0',
       true
    );
}
add_action( 'admin_enqueue_scripts', 'rs_customers_enqueue_scripts' );
Defining the JavaScript file
To simplify things for those who are not comfortable with NPM or React, I’ve kept this as a plain JavaScript file. That means you do not need to build or compile code. We also don’t need to worry about using imports, instead we just call methods directly using the WordPress API such as wp.hooks.addFilter().
The goal of this code is to add a new column called “Company” to the Customers screen.
Rather than breaking this down into pieces, I’ve left it as one large block of code. Refer to the comments for an explanation.
// Wait for document to be ready
wp.domReady(function() {

	// This console message is just to help you know that your JS is included correctly. If you do not see it in your console, the JS file may have the wrong URL.
	console.log('[RS Customers] Ready to add the Company column');

	// Add a custom column to the WooCommerce > Customers screen
	// @see https://developer.woocommerce.com/2020/02/20/extending-wc-admin-reports/
	const addTableColumn = reportTableData => {
		// Check that this is the Customers endpoint
		if ( 'customers' !== reportTableData.endpoint ) {
			return reportTableData;
		}

		// Add column header
		reportTableData.headers = [
			{
				label: 'Company',
				key: 'company',
			},
			...reportTableData.headers,
		];

		// Add content for a given item
		reportTableData.rows = reportTableData.rows.map( ( row, index ) => {
			const item = reportTableData.items.data[ index ];
			return [
				{
					display: item.company || '',
					value: item.company || ''
				},
				...row
			];
		} );

		return reportTableData;
	};

	// Add a filter to WooCommerce to include our custom column
	wp.hooks.addFilter( 'woocommerce_admin_report_table', 'rs-customers', addTableColumn );

});
Once you have this JavaScript file being loaded on the Customers screen, I recommend opening DevTools Console to monitor for any errors.
The console should also report the message “[RS Customers] Ready to add the Company column“, if implemented correctly.
Once it all works, you should see the Company column at the beginning of the table. Don’t worry that all the values are blank at this point – we’ll get to that next.

Adding custom data to the Customer item object
Although our previous code references “item.company“, we haven’t actually defined that value yet. More specifically, we need to get the value for each user that is displayed in the list. Because the table loads data using JavaScript, we’ll need to add our custom user data to the proper REST endpoint to make it available to the “item” object.
In order to add data to the item we can use a single action in PHP to get the company name.
/**
* Add the company data to the Customers REST route
*
* @see \Automattic\WooCommerce\Admin\API\Reports\Customers\Controller::prepare_item_for_response()
*
* @param \WP_REST_Response $response The response object.
*
* @return \WP_REST_Response
*/
function rs_customers_get_customer_data( $response ) {
// The user ID is provided in the "id" property, lowercase
$user_id = $response->data['id'];
// Add a new "company" property using the "billing_company" user meta field, which comes with WooCommerce
$response->data['company'] = get_user_meta( $user_id, 'billing_company', true );
return $response;
}
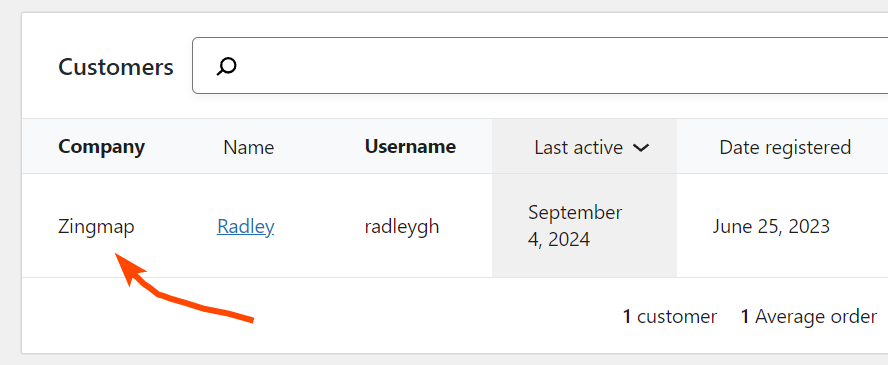
add_action( 'woocommerce_rest_prepare_report_customers', 'rs_customers_get_customer_data' );Once implemented, the Customers screen should now be able to show the Company name for each user:
Conclusion
We’ve successfully added a custom column to the Customers screen, and filled the column using custom user metadata.
This solution can be extended to other screens as well, such as the Analytics and Marketing tabs. The endpoint referenced in both JS and PHP would change in that case.
Leave a Reply